Setup instructions
Please follow the instructions carefully.
Setup software
Please setup software before connect the scanner to the PC. The installation file already includes all necessary drivers.
Download latest D3D-s version
Setup processing software
After the scanner completes its work, you will receive a set of meshes. However, to achieve the final result, you need to align and merge them into a single mesh. This can be done using specialized software. For example, MeshLab, developed by an Italian university, contains numerous filters and tools but is complex to use and learn. The program PointKit works more efficiently and faster. You can also use any other post-processing software, such as Artec Studio. We recommend using PointKit; it will be easier for you to learn and will result in fewer issues during usage. Formally, the PointKit program is paid, but for jewelry needs and the tasks we address, the free version is completely sufficient. The paid version offers extended features such as script creation and mesh comparison. These functions are only necessary for large industrial enterprises.
Open PointKit PageOR setup MeshLab. If you have already setup any other version of MeshLab, please uninstall it.
The first rule of the 3D scanning club
If something isn't working out for you, don't stress yourself—reach out to our support team. First, your feedback helps us make our product better. Second, why spend hours on something that can be fixed in 30 seconds? If something isn't working, don't spend more than five minutes on it. Write to us or call us. We truly look forward to your calls and messages.
Signal, WatsApp : +380 672204486 (+380 - Ukraine's code)
e-mail: denys@d3d-s.com
Path to the working folder
After launching the program, go to the second tab located at the top. On the second tab, you need to specify the path to the folder where the scanned meshes will be stored. Therefore, it is advisable to choose a fast SSD drive with ample free space. In this folder, directories with the name of your project will be created. Each folder will store meshes in the stl format. Accordingly, you can process them in any program like MeshLab, PointKit, FlexScan (old version of PointKit), Artec Studio.
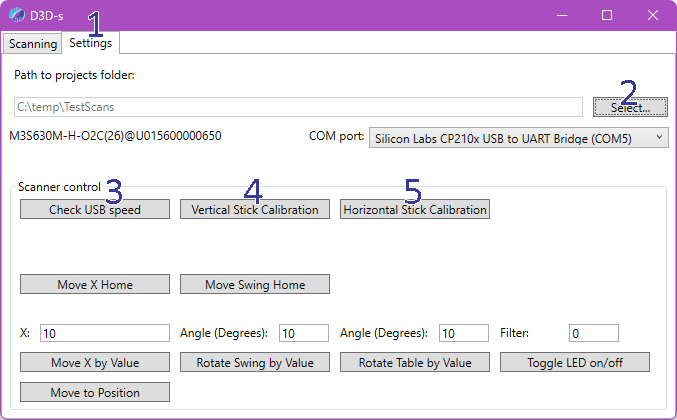
Check USB speed
By pressing the speed check button, you can roughly determine whether the USB connection speed is sufficient for the scanner to operate. For the scanner to function properly, a high USB bandwidth is necessary; otherwise, you will receive subpar results. Problems often arise for users who connect the scanner to a USB hub that has multiple devices attached or lacks a power supply. There are also cases where USB ports appear to be different, but internally within the PC, they are connected to the same bus. If you try to use the scanner simultaneously with another device that also requires the transfer of large volumes of data, such as a Wacom tablet, camera, or display, issues can occur. Therefore, to ensure everything works smoothly, make sure you are using a powered USB hub and ensure there are no high-demand USB traffic consumers while operating the scanner. If problems persist, try using a different hub or connecting to another port.
Vertical Stick Calibration
Take the calibration rod from the scanner kit. Screw it onto the lower part of the scanner table until it stops. After that, press the Vertical Stick Calibration button.

Horizontal Stick Calibration
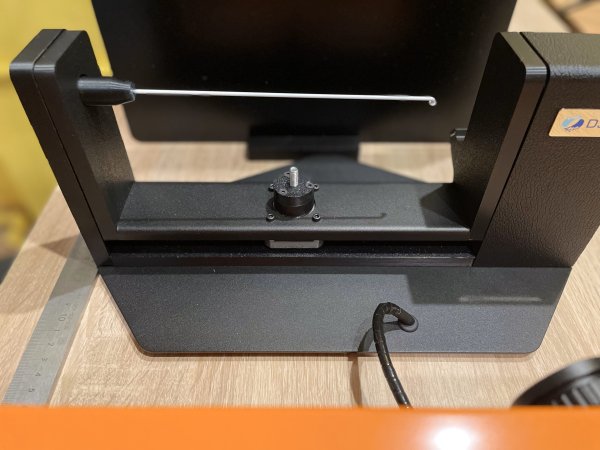
For horizontal calibration, screw the calibration rod into the side part of the table as shown in the photograph until it stops and press the Horizontal Stick Calibration button.
How to use the software
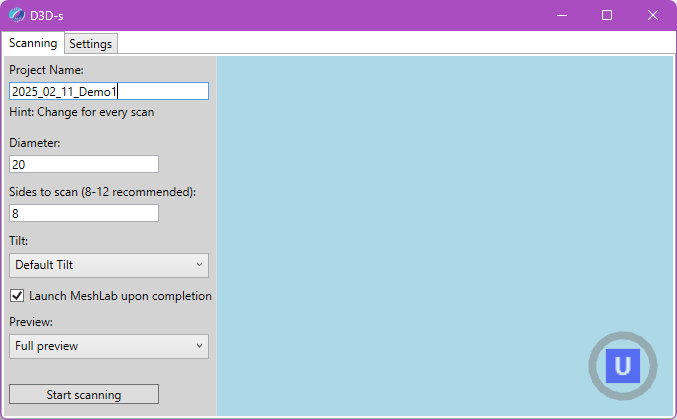
0) Switch to the first tab.
1) Name the project. Change this name with each new scan. Changing the name will clear the model's preview. Please note that the model's preview is in draft form and the final model will look different.
The project name is the name of the folder where the RAW meshes will be stored, and this folder, in turn, will be saved in the folder you specified in the settings. It is prohibited to use characters that are not allowed in file names, such as slashes, etc.
2) Specify the diameter of the model in millimeters. It is advisable to define a zone a few millimeters larger than the actual object. The larger this number, the longer the scanning time, but it can be estimated approximately.
3) Specify how many sides need to be scanned. If you select 'no tilt' in the next parameter, you will get 8 meshes, meaning the model will be rotated 8 times and scanned. If you specify a tilt, you will get 8 meshes for each tilt. The tilt is set in the next section. Do not specify an excessively large number here. 8 sides are sufficient for simple objects, and 12 for very complex ones.
4) Specify whether you want the swing to tilt. If you choose 'No tilt,' the swing will remain in a single position. If you select 'Default Tilt,' scanning will occur in two swing positions that we have chosen as optimal. If you want to set your own values for the swing, select 'Specify Custom Tilt' and specify the angles separated by commas. You can specify any number of values from zero to 180. Zero is when the swing tilts toward the scanner cameras.
5) If you are scanning a very large object and your PC has limited memory, we recommend disabling the preview mode. This can be done directly during the scanning process. Scan one side, ensure everything is fine, and then disable it.
6) This video depicts the scanning and modeling process from start to finish. If necessary, you can speed up the video.
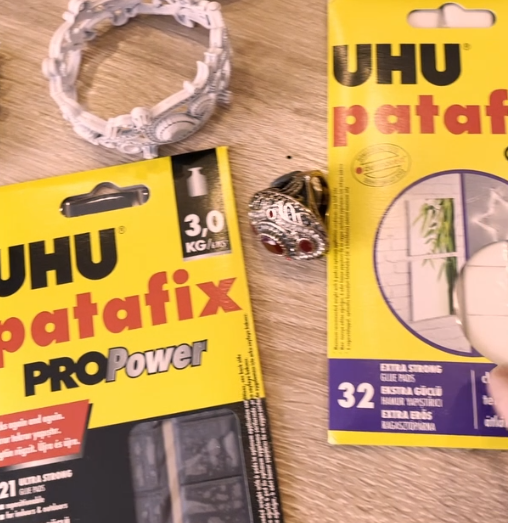
7) To secure models, you can use these glue pads. If your model has a curved shape and many details, use black glue pads to make the support less visible and require less removal. If your model is flat like a coin or doesn't have enough alignment points for the program to use, then use white glue pads to create these additional points through support.
How to Use PointKit
Please take a look at the video on how to process the final results with PointKit.
A more complex way to secure the model
How to Use MeshLab
Please take a look at the video on how to process the final results with MeshLab.
If it's necessary, you can combine a few meshes together.
You can slow down the video in Youtube settings
How to delete the support -
MeshLab tutorials
1) MeshLab is a very powerful program you can start learning from Basics Tutorials
https://www.youtube.com/c/MrPMeshLabTutorials/playlistsContact Us
Don't hesitate to ask questions -
Viber, WatsApp : +380672204486
Skype: dennis.nazarenko
e-mail: denys@d3d-s.com